
Do you see double images on your binoculars? If yes, don’t get excited that you have discovered a new place; because all you can see is actually one image. This double vision indicates that your equipment is out of collimation. It would be best if you learned how to collimate binoculars so that you can fix the issue.
Collimation is a process by which manufacturers systematically align your binoculars’ lenses and other components to bring images to their perfect focus. When you mishandle the equipment, you might cause its prisms and lenses to misalign and go out of collimation, making you see two different images. Such a piece of optical equipment that has double vision is deemed to be useless. You cannot differentiate two objects using it or precisely focus on any spot.
Fortunately for you, collimating your binoculars isn’t rocket science. You can do it yourself with ease and within minutes. In this article, we’ll show you step-by-step instructions on how to collimate binoculars. So let’s begin.
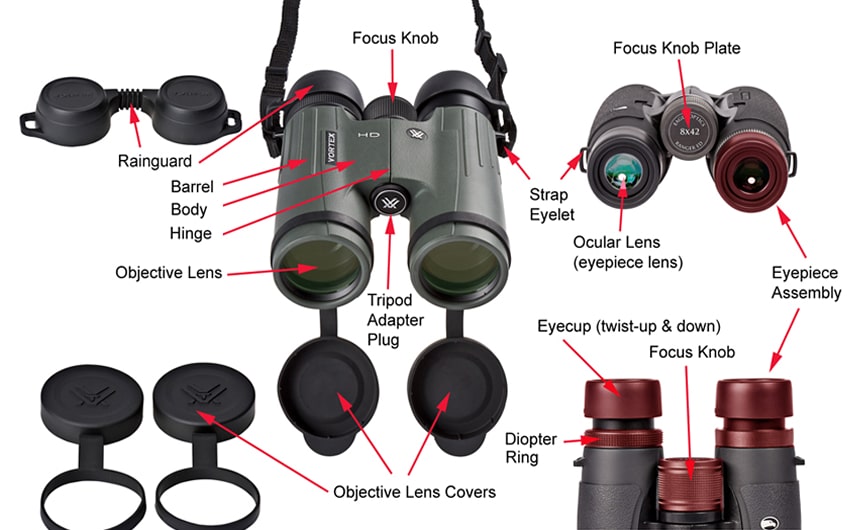
Before we dive straight into the six steps, there are some key terminologies and parts of binoculars you should know. With this knowledge, you will not fiddle with the wrong places when repairing your equipment. These include:
There are some specific tools and materials you need to complete the task successfully. Here are the items you must get beforehand.
If your optical equipment is still under warranty, you do not need any of the above tools. We recommend returning them to where you purchased them for repair or replacement. Please do not attempt to open them. Otherwise, you will forfeit the warranty.
Follow this procedure at your own risk. Binoculars are delicate instruments and may break if mishandled. If the equipment is expensive, you should have a professional repair it. For cheaper models, the repair will cost you more than the price of replacing them.
You have several best binoculars under $200 that can meet your needs to choose from if you need a replacement. According to most user reviews, the cheapest and best-rated binoculars must be the Bushnell Legacy WP 10-22×50 Binoculars 121225. This particular optical equipment has incredible zooming capabilities, incredible power, and durability.
If you own a cheap model, you have nothing to lose by attempting to repair it. Here is the precise procedure you should follow to collimate your binoculars.
Start by locating the collimating screws in the eyepiece side of your binoculars. Use a knife to lift the rubber or plastic coasting up since they usually are underneath your barrel’s rubber or plastic coat.
Do not confuse these screws with crosshead ones. You should only look for screws that will fit into a flat head screwdriver.
Once you’ve found the screws, mount the binoculars onto the hinging arm using the hinge clamp or L bracket. Make sure that you mount them firmly.
Focus your binoculars on a stationary item. We recommend repairing at night so that you can focus on fixed stars or any other object such as a telecommunication antenna. The night sky will show that your equipment has poor collimation better than any object observed during the day.
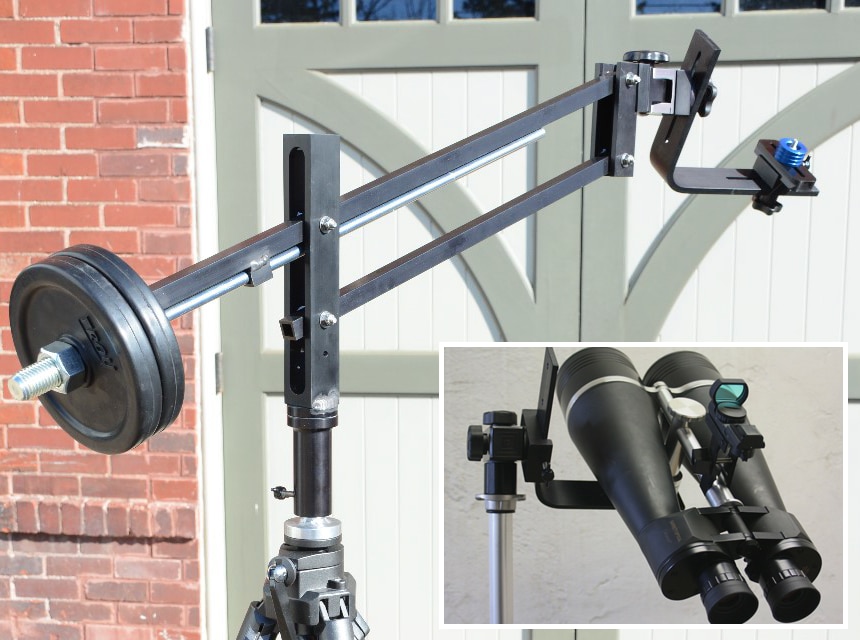
Now, defocus one eye while looking through both eyes. Your left eye should see everything clearly, but your right eye should see some blurriness. It means that your right eye is out of alignment. This setting will fool your brain into thinking that it sees two different images.
You should note that this might cause eyestrain and headache. So, do not observe your object for an extended period. To defocus the right eye, use the diopter adjuster. Adjust it until you only see a blurry image on the right side. You can also achieve the same results by placing a colored glass on the right side of your binoculars.
Adjust the two barrels so that they can fit your inter-pupillary distance perfectly. Use your diopter and focus wheel on adjusting the image until it is sharp.
If you notice that the sharp image on the left side is off-center from the blurry blob on the right side, it means your binoculars are out of collimation. If not, your binoculars are okay, and you do not need to collimate them.
Adjusting the screws is the essential step in the whole procedure. As such, you need to be extra careful not to damage your equipment.
While in the eye relief position, use a flat-headed screwdriver to turn the collimating screws. It would be best if you only made tiny adjustments on each side while you observed the images. We recommend turning the collimation screws about an eighth of a circle each time.
Adjust the screws till the sharp and blurry blob images are in line. Now, adjust the right side so that both images are sharp.
Viola! You have successfully collimated your binoculars. You should now put the rubber or plastic coasting you removed back into its original place. You can glue it so that it fits perfectly.
The binocular collimation process is that simple. Keep in mind that you have not fully collimated your equipment. You only did conditional collimation for the inter-pupillary distance you used during the procedure. Images will only appear sharp when you focus on them using that specific distance. When you use a different inter-pupillary space, you will notice that the equipment is still out of collimation.
Hence, this procedure on how to collimate binoculars is just a temporary fix. You will be better off purchasing a piece of new equipment for better viewing at any inter-pupillary distance. Your replacement should be rigid and able to handle extreme conditions so that it doesn’t go out of collimation quickly.
According to most user reviews, the Nikon 12×50 Action Extreme Binoculars 7246 must be the most affordable and powerful gadget you can purchase to replace your faulty binoculars. Thanks to its rigid construction, this model offers a reliable performance even under extreme conditions.

