
Whether you’re at the range or hunting in the wild, a powered scope can quickly make a big difference in your accuracy.
A rifle scope is an optical sighting system consisting of a set of lenses to magnify and focus the target. Its main advantage is helping with creating a line of sight to the intended point of impact so that you can aim properly. A scope works just like a telescope by collecting light from the object and creating a focused image, where the crosshairs create a specific point at which to aim.
Lots of people swear by iron sights, red dots, or holographic sights, but scopes have a few things going for them that make them special. Understanding how a rifle scope works will help you know why that is, as well as how to use a rifle to become a better marksman in every way.
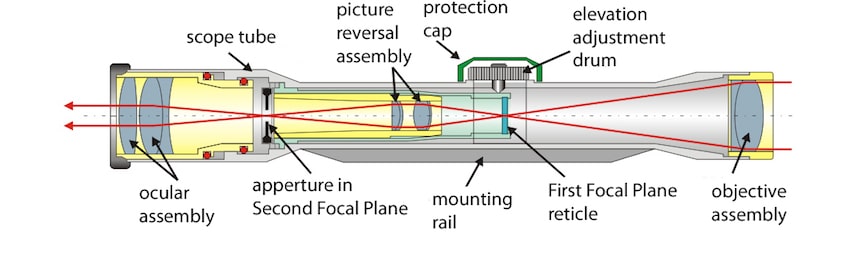
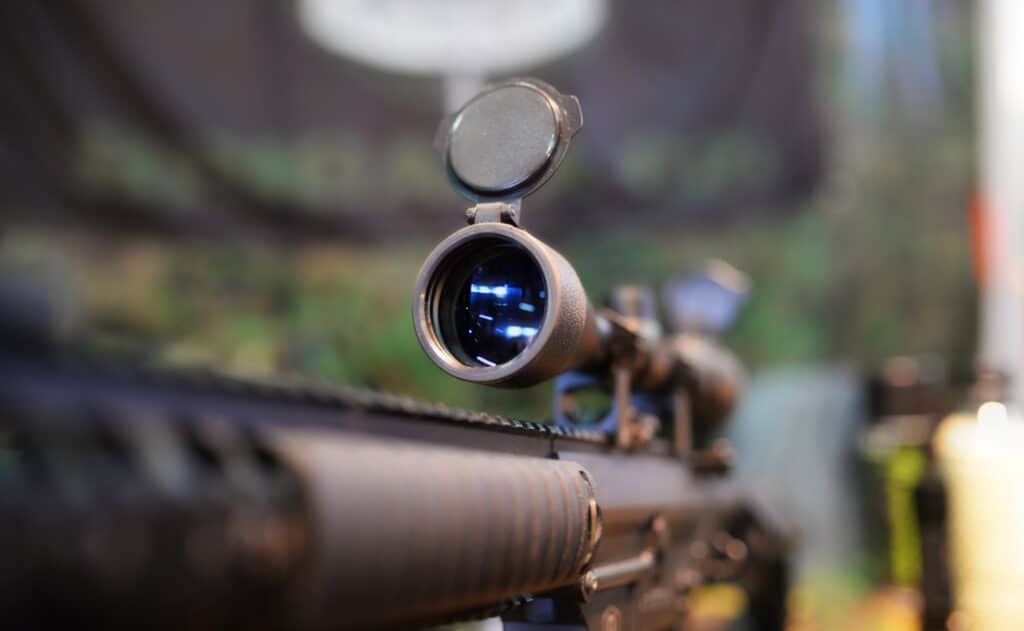
When you look at the image of a typical rifle scope such as this one on Wikimedia Commons Trusted Source upload.wikimedia.org , you are bound to see a few distinct features. One is the bell-shaped end that houses the objective lens; this end is in fact called the objective bell. The objective lens will be bigger than the eyepiece, depending on the power of the scope.
The eyepiece or ocular is the end of the tube that you look through. It contains the ocular lens assembly, aperture, and usually a means of adjusting the lens focus or magnification.
Between the two lenses is the erector tube, so-called because it contains the erector lens assembly. It will also have the windage and elevation adjustment knobs, magnification lenses, and the reticle (crosshairs).
The internal components of a rifle scope and how they work together is what determines how good your scope is.
The objective lens assembly will be in the bell housing at the front of the scope, which doesn’t really have to be bell-shaped. In 1x scopes, the objective lens side can be the same size in diameter.
However, a larger objective lens is usually preferable because it gathers more light into the scope, which means a bigger and clearer image is formed.
Each size of the objective lens will have a corresponding exit pupil size, which is the size of the circular image you see when looking through the ocular. However, very large lenses are impractical because the diameter of your eye’s pupil determines how large you can make the image (exit pupil.).
Large objective lenses have a larger exit pupil, but they can only be as large as the maximum pupil size of the human eye. We will cover more on exit pupil size and eye relief in a short while.
With this reasoning, very large objective lenses are impractical due to all the size and weight implications they add to your rifle scope. Most objective lenses are 40mm or 50mm in diameter to give you a decent exit pupil of up to 8mm.
The only other advantage of a larger scope is that it ensures better image quality in low light conditions and high magnification. Talking of magnification, the power of a scope is the number of times it makes the field of view (image) appear larger than what the naked eye can see.
Zooming on a rifle scope works by moving the magnification lens, which is mounted on an internal rail, towards the objective lens. This varies the focal length of the objective and reflector lens, thus increasing the size of the image.
All of this is better explained in this article about how a Bushnell rifle works. In short, “zooming” the scope brings the lenses closer and increases the image size.
The manufacturer usually provides information about the size of the objective lens and its magnification on both the scope and its box in numbers like this one: 3X40. This example is a fixed power scope with a 3X magnification and a 40mm objective lens.
However, most scopes have variable magnification, so numbers like 3-10X40 are more common. Such variable scopes have a power ring adjustment near the ocular lens to change the magnification from low power (3X) to higher power settings (up to 10X).
You should know that most manufacturers base their scopes on a 100-yard (91.4m) range. At higher magnification settings, different issues start to emerge such as image quality due to issues such as parallax, aberration, field curvature, and dimness due to a lower amount of light getting inside.
The reticle is a kind of a crosshair pattern that gives you a central aiming point when looking through the ocular lenses. Before the second world war, most reticles were actual crossed hairs or very thin wires installed inside the erector tube.
Today, the reticle can use the same old crossed wires, be etched on the glass, or use a collimated laser diode displayed when the scope is turned on. Regardless of the manufacturing method used to create the reticle, there are different types that are easily identifiable just by looking.
This is the original reticle featuring horizontal and vertical crosshairs crossing in the middle. The point at which they meet becomes the aiming point, but it takes good skill to place your round within the intended point of impact due to the lack of assistive additions. Due to its fine clear lines, this type of reticle blends easily into the background of the image and becomes harder to see.
This is a more common type of reticle found in hunting rifles. It is considered an all-purpose kind of reticle that has largely replaced the traditional crosshairs because its thicker lines make it easier to see. Duplex reticles are quite popular with classic hunting rifles such as the Marlin 60 due to their simplicity.
The mildot reticle is a variation of the duplex that uses several small dots near the center of the reticle that can be used to range target distance so long as the size of the target is known. The “mil” in the name is short for milliradian, which is the 1000th part of a radian.
One mil of subtension (subtension is the distance between points as viewed on the reticle) represents 3.6 inches at 100 yards, 7.2 inches at 200 yards, and so on.
There is another kind of adjustment that relies on Minutes of Angle (MOA) instead of mils. This type tends to be easier and more accurate for short distance shooting up to about 400 yards because the MOA is smaller (1.047 inches) than the milliradian.
Whichever kind of adjustment you’re using, it takes some math to calculate range with a mildot reticle Trusted Source How to Calculate Distances With a Mil Dot Rifle Scope: 7 Steps Mil Dot scopes are optics which allow users to easily calculate distances to a target without fancy equipment. www.wikihow.com . This method becomes less and less accurate with increasing distance, and even the military now prefers that its snipers have spotters using more accurate laser rangefinders.
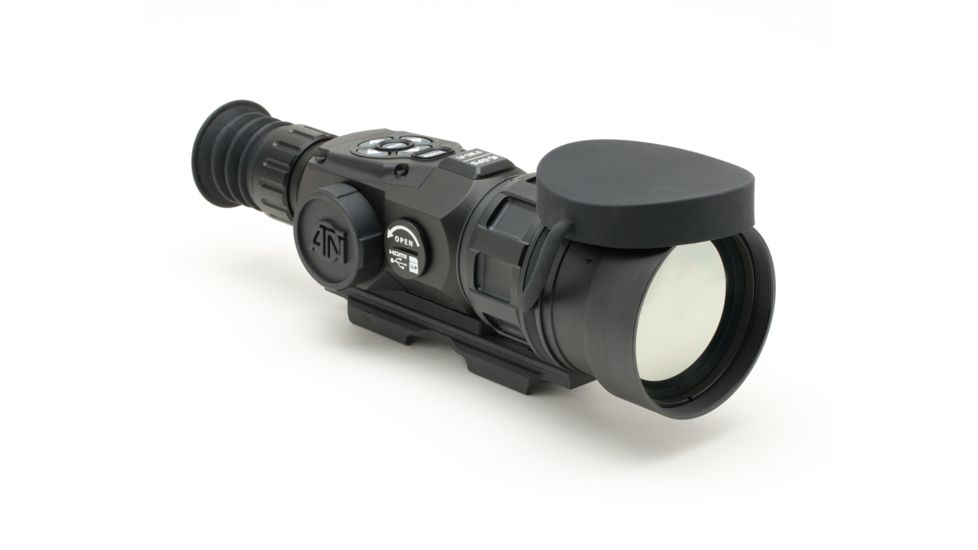
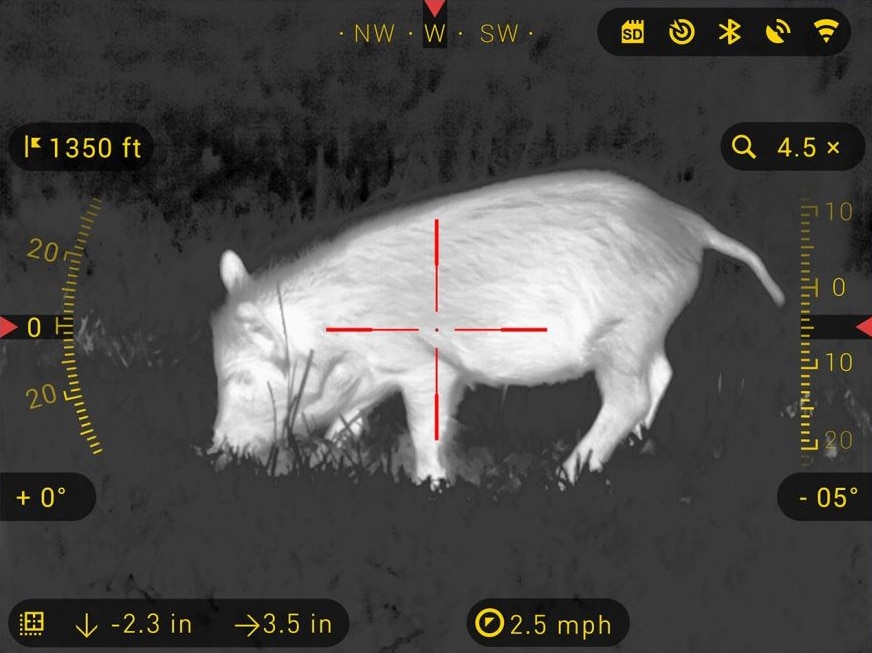
If you don’t already have a reliable range finder, many users recommend the ATN ThOR-HD 640. Featuring 5-50X of power, thermal imaging, high-resolution video recording, a laser range finder, ballistic calculator, and a smartphone app, this is so much more than any run-of-the-mill scope. Many users have fallen in love with its recording feature, so who said being tacti-cool is bad?
The natural travel of a bullet after firing is not usually a straight line but a curved trajectory due to the effect of gravity. Bullet drop compensation is a fancy way of showing elevation using a mildot or similar kind of scale. That way, you can aim higher or lower to account for the drop in the bullet’s height.
Most reticles will come with some kind of bullet drop compensation, even these rifle scopes below $300.
These advanced reticles have a “Christmas tree” pattern with multiple aiming points calibrated along the horizontal and vertical axes. These markings are meant to help you adjust for both bullet drop and wind drift, so they are also called wind-drift reticles. They are more common on professional tactical scopes, but you will see them in competitive and recreational use as well.
Illuminated reticles are designed so that the crosshairs are visible even in low light situations. Any reticle type above can be illuminated, but most people don’t like them because most are too brightly illuminated and affect the clarity of the scope’s field of view.
The single most important difference in the reticle type is probably the mounting position. A reticle mounted at the front of the magnification lens is called a “front or first focal plane” scope (FFP), while one with the reticle behind the magnification is a “rear or second focal plane” scope.
When the reticle and other ranging aids are mounted in front of the magnification lenses, the size of the reticle grows with the size of the image. Thus, zooming in on the target also increases the size of the reticle.
Many hunters here in the US are adopting the FFP type of scope due to its advantages. For one, the object remains clear and visible even at a long range. Second, the reticle can be used reliably for distance and subtension estimations regardless of the magnification because the ratio of distances to magnification power remains constant.
The problem with FFP reticles is that the magnified reticle lines can obscure important features and parts of the target, which some professionals would rather avoid. That’s why even duplex reticles have a thinner line at the crosshairs to account for this issue.
Second plane rifle scopes have the reticle positioned behind the magnification lenses. This way, the reticle appears to always be the same size regardless of the magnification, which gives it better subtension than FFP scopes and thus a more precise shot. That’s because it is easier to view objects at a distance with an SFP.
SFC rifle scopes are often high-end devices with magnifications of up to 100X. They are difficult to use at low power and the reticle’s distance markings are only accurate at maximum magnification. Even then, SFP rifle scopes remain among the most popular in America today.
On the main body of the scope between the lenses, you will find two or three adjustment knobs. You might already know how to use these knobs, but how does rifle scope adjustment work?
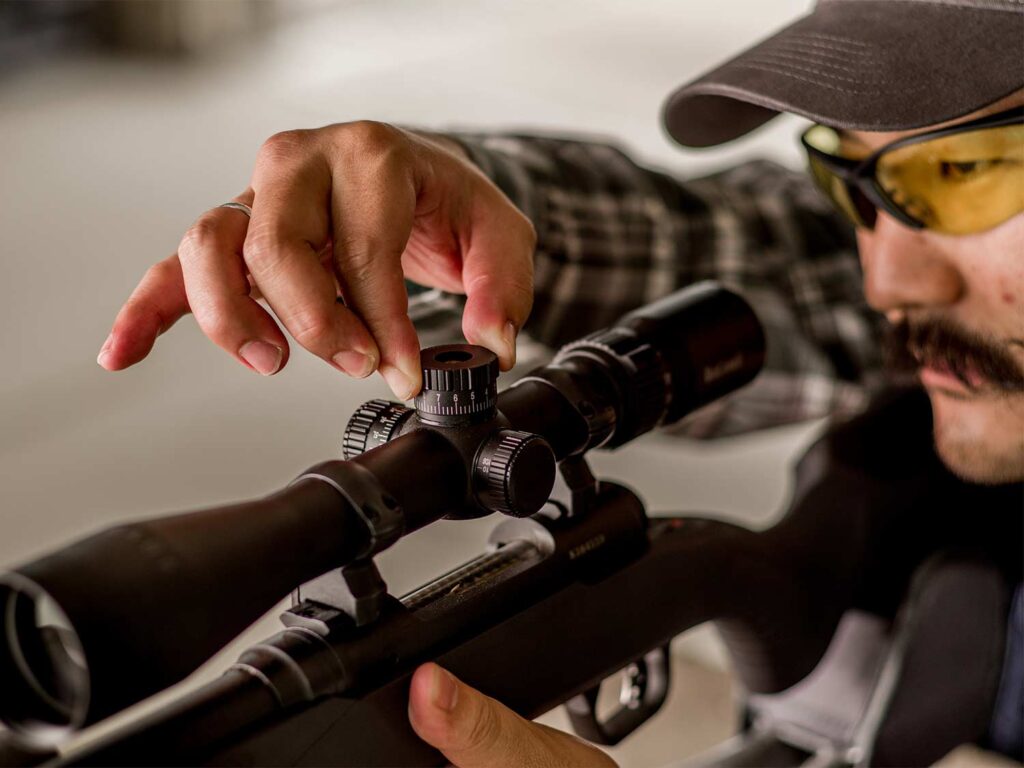
The adjustment knob at the top of the scope is called the elevation adjustment knob or turret and is used to adjust the elevation or height of the expected point of impact. Thus, if your first shot goes low relative to the target, you can use the turret to raise the expected point of impact for the next shot.
The adjustment knob on the right side is known as the windage. The windage is used to make left and right adjustments to compensate for wind speed and other factors. At short distances of 60 yards or less, wind speed may not be a big issue. However, strong winds and a shooting distance of 200 yards or more will certainly require some windage adjustment.
Most adjustment knobs use Minutes of Angle (MOA) adjustment represented by small clicks made every time you make a turn on the adjustment knob. We already saw that one MOA equals 1.047 inches at 100 yards, which can be assumed to be 1 inch for most purposes.
One click on the adjustment knob will represent a specific value of MOA depending on the manufacturer’s instructions. For example, a ¼ MOA scope means that every click on the scope is equal to ¼ MOA or ¼ inch. Thus, making an adjustment of 1 inch or 1 MOA will require 4 clicks in the required direction at 100 yards. This adjustment doubles at 200 yards, triples at 300 yards, and so on.
Making adjustments on your rifle to bring the target in focus is called zeroing or sighting. Zeroing is done before shooting depending on the bullet’s expected trajectory and the range. Generally, zeroing your scope for 100 or 200 yards is sufficient for most shots up to 400 yards.
Many modern scopes also come with a third knob for parallax adjustments. This knob will usually be on the less dominant side of the scope.
Before we get to discussing parallax, bear in mind that your scope may come with turret covers to protect the adjustment knobs. These covers can be removed easily to expose the knob. Some knobs can be adjusted easily by hand, but others do require you to have an object such as a coin for adjustment.
A lot of people, even expert hunters, ask “how does parallax work on a rifle scope?” Well, have you ever had that experience where the target looks slightly out of focus when you move your head slightly to the left or right? That’s parallax.
Technically, parallax occurs when the target and scope are on different focal planes, which is why they seem to move relative to each other when you shift your head. It doesn’t necessarily cause a big difference in shot accuracy at short distances, but it can become a big deal in long-range shooting over 250 yards.
Parallax error usually occurs when you switch magnification settings. Adjusting the parallax knob at the side of the scope slowly brings the two planes together, but you’ve got to start by adjusting the parallax knob to infinity. From there, put your sights on a target at a known distance and adjust the parallax until the reticle becomes clear.
When you’ve got the reticle in focus, try moving your head a bit to seek if the two planes are still losing focus. Another thing you might need to know is that scopes with parallax adjustment are rarely accurate straight from the factory. Even the yardage markings on the dial could be off, so take time to adjust the parallax accordingly.
For scopes without parallax adjustment, the mechanics are a little different. Fixed-power scopes have no parallax because there is only one power setting which will have been compensated for straight from the factory.
If the scope is suffering from parallax and there is no adjustment knob, you may need to remove the ¼” ring covering the lens carrier near the scope’s bell housing. Be aware that doing this could allow anti-fog inert gas inside to escape, which would lead to expensive repairs.
When you look through a rifle, what you see is a small, bright circle of light in the center of the eyepiece. If this image is very small, your eye has to be perfectly aligned with the ocular lens to see the image clearly.
This round aperture where the light comes out is called the exit pupil of the scope. It is so-named because that’s where the light comes out of the system. Only this light will be visible to the observer. A larger exit pupil reduces the need for precise positioning of your eyes to line up perfectly with the image.
You can calculate the exit pupil size by dividing the diameter of the objective lens by the magnification. Thus, a 10X50mm scope will have a 5mm exit pupil, while a low-powered 4X32mm has a larger 8mm exit scope. Now you can see why low-powered scopes have bigger, brighter images and are better for use in low-light situations.
A large exit pupil also means that you can position your scope quickly and squeeze off a shot faster than you could if your scope had a smaller exit pupil. This is especially useful in close situations such as when hunting big dangerous game.
Perhaps now you can understand why some scopes don’t need you to place your eye very near the ocular to see the image clearly. This effective distance at which you must hold your shooting eye from the ocular lens to see the full image clearly is called eye relief or eye clearance.
When you view the image too close or too far, you have incorrect eye relief which means that the image will be fuzzy or blurred by a black ring around it. But it can get much worse than just a fuzzy image.
For instance, using a scope with a short eye relief on a powerful rifle could cause the scope to smack back into your eye on the recoil. That’s pretty serious, so you need to know more about the two types of eye relief.
Night vision scopes are a special kind of scope designed for use in low-light or no-light situations, either at night or indoors. They work by amplifying any available light and helping you see things in the dark up to 1000 yards away.
Night vision scopes have become quite common nowadays. We have two types of night vision technology that they can use to allow humans to see in the dark. It’s also worth pointing out here that night vision scopes tend to be low-powered – usually about 3x-5x of magnification is reasonable a night vision rifle scope.
Optoelectronic image enhancement is the traditional kind of night vision. It works by sensing small amounts of infrared light and amplifying the signal gained electronically to produce the signature glowing green image.
Optoelectronic technology relies on a series of optical lenses and an electronic vacuum tube used to capture and amplify infrared light. An objective lens in the system captures dim light from the subject and passes it into an image intensifier tube.
The intensifier tube is powered by N-Cell or AA batteries which enable the first part of the tube, called the photocathode, to convert incoming light photons into electrons. The electrons then pass though the second part called the microchannel plate (MCP), which amplifies the signal thousands of times over.
These electrons can then come out onto a phosphor-coated screen,the same kind of screen you would find on old CRT TVs. This is the screen that glows green which in turn is visible through the ocular lens. Due to the conversion process of photons into electrons, the image viewed would be in color. The screen lights up green in the dark because it’s easier to look at for extended periods of time.
Digital image enhancement technology captures available ambient light and stores the image in a digital sensor. The image is then digitally processed to help produce a full-color display.
Unlike traditional night vision, digital image enhancement makes use of complementary metal-oxide-semiconductor (CMOS) sensors. That’s just like the sensor in smartphones and digital cameras, except that this one enhances the image electronically and magnifies it several times before sending it to an LCD display.
Digital night vision scopes can be viewed in full HD (1080p) with still image and video recording capabilities. They can also be configured to sare live feeds or store footage in digital storage media.
One such example of an advanced night vision device is the ATN BinoX 4T Thermal Binoculars that even comes with a laser range finder, full HD video, and a smartphone app. The ATN BinoX thermal binoculars have been highly popular because of their quality construction that gives them amazing clarity and ease of use when carried to the field.
Most night vision scopes require at least some amount of ambient light for the best image quality. Even though many also come with their own infrared illuminators or invisible torches, thermal scopes could make a better option when you need to hunt in complete darkness.
Thermal rifle scopes work a little differently from night-vision because they rely on heat signals emitted by the target while NV rely on reflected light. Despite the similarity of signals used, thermal scopes create a temperature map of the surroundings called a thermogram from which objects with higher heat signatures a[[ear in sharp contrast to the cooler background.
Such a scope uses a special kind of thermal lens to focus the infrared light emitted by objects, after which a phased array of infrared detectors scans this image and creates the image. Like night vision scopes, thermal rifle scopes also require batteries to work properly.
If you’ve been wondering “how does a thermal rifle scope work,” there you go. It just collects a bunch of invisible heat signals to show the bright yellow or orange image you see at night.
Night vision scopes or either type work a little differently from thermal scopes. Because they rely on heat energy emitted by subjects, thermal rifle scopes do not require any external illumination.
More importantly, thermal scopes can see through obstructions such as weather (fog, rain, snow), smoke, dust, and vegetation which would otherwise block night vision scopes from seeing. Thus, they are very good at detection when lighting and visibility is especially bad.
The downsides to thermal scopes is that they don’t create a lot of detail, especially at a distance. Thus, it may be tough to identify what you’re shooting at unless you move it for a closer look. Night vision is much better at recognition at distances of up to 400 yards, but it lacks contrast so that detection can be problematic.
While thermal scopes are more expensive, it usually pays to have both types in your backpack when you’re going out hunting. The two can work great at complementing each other’s abilities, but a high-end night-vision scope still wins if you’re talking about solo use in typical hunting conditions.
Good steel and good glass – that’s how you get a sub-MOA grouping. Without a good scope and knowing how to use it properly, even the best training and technique won’t save you. A 2mm parallax error could end up being inches wide off the mark at a 500-yard target, and that’s not even counting bullet drop compensation and other factors.
Experts say that a great scope on a comparably mediocre rifle can do more for your accuracy than a great rifle with a bad scope. We tend to agree, but this article teaching you how a rifle scope works will help you rise to an expert-level use of optics to make more precise shots.
 About us
  Contact Us